Performance
This section discusses performance-related topics, such as making the voxel engine run fast. It can be more technical than the other sections.
Threads
Thread count
This module uses threads to speed up heavy operations and avoid stalls.
Depending on how many threads your CPU can run at the same time, the optimal number of threads can vary. This may also differ for players running your game. The module automatically determines the number of threads to use at runtime, based on how many concurrent threads the CPU supports.
You can change how many threads are allocated in your Project Settings, in the Voxel section (if you don't see it, try checking "Advanced Settings").
The automatic calculation will be based on the following properties:
| Parameter name | Type | Description |
|---|---|---|
voxel/threads/count/minimum |
int |
Minimum amount of threads |
voxel/threads/count/margin_below_maximum |
int |
How many threads below max concurrent count should be considered maximum. 0 means the maximum concurrent count will be the maximum. 1 means the maximum concurrent count minus 1 will be the maximum. |
voxel/threads/count/ratio_over_maximum |
float |
Portion of max concurrent threads to attempt using, between 0 and 1. For example, 0.5 will attempt to use half of them. The result will be clamped using the other options. |
Several notes:
- It is recommended to not use all available threads for voxel stuff. Games use more for other things, and players may even do something else in background (such as music, YouTube playlist or voice chat).
- It is not possible to use zero threads. The module is designed to use threads at the moment.
- You can check at runtime how many theads are allocated with a script and using
VoxelEngine.get_stats(). It is also printed ifdebug/settings/stdout/verbose_stdoutis enabled in project settings (or-vin command line). - Changing these settings requires an editor restart (or game restart) to take effect.
Main thread timeout
Some tasks still have to run on the main thread, and sometimes their total time can exceed the duration of a frame, if we were to add all the remaining things that have to be processed.
To mitigate this, the module has an option to stop processing these tasks beyond a certain amount of milliseconds, and continue them over next frames. In ProjectSettings, look for voxel/threads/main/time_budget_ms.
Rendering
Terrains are rendered with many unique meshes. That can amount for a lot of draw calls and work for the engine to cull. It is possible to reduce the number of blocks in several ways:
- Reduce view distance
- Reduce LOD distance, if you use
VoxelLodTerrain - Increase mesh block size: they default to 16, but it can be set to 32 instead. This reduces the number of draw calls, but may increase the time it takes to modify voxels.
Slow mesh updates issue with OpenGL
Issue
Godot 3.x is using OpenGL, and there is an issue which currently degrades performance of this voxel engine a lot. Framerate is not necessarily bad, but the speed at which voxel terrain updates is very low, compared to what it should be. So far the issue has been seen on Windows, on both Intel or nVidia cards.
Note: Godot 4.x will have an OpenGL renderer, but this issue has not been tested here yet.
Workarounds
Note: you don't have to do them all at once, picking just one of them can improve the situation.
- Increase
voxel/threads/main/time_budget_msto a value higher than frame time (by default it is about 8 ms, which is half of a frame). However this can slowdown FPS while meshes are updated. - Or turn on
debug/settings/stdout/verbose_stdoutin project settings. This internally enables an OpenGL debugging extension, which for some reason fixes the expected timing of OpenGL calls. It's the most effective fix regarding framerate, but has drawbacks because it prints a lot, and was intented as a debugging feature. - Or turn off
display/window/vsync/use_vsyncin project settings. Not as effective and eats more resources, but improves performance. - Or turn on
display/window/vsync/vsync_via_compositorin project settings. Not as effective but can improve performance in windowed mode.
Explanation
The engine relies a lot on uploading many meshes at runtime, and this cannot be threaded efficiently in Godot 3.x so far. So instead, meshes are uploaded in the main thread, until part of the frame time elapsed. Beyond that time, the engine stops and continues next frame. This is intented to smooth out the load and avoid stutters caused by the task CPU-side. Other tasks that cannot be threaded are also put into the same queue, like creating colliders.
Unfortunately, the first call to OpenGL during the frame appears to take a whopping 15 milliseconds on the CPU. This happens no matter how heavy the call is. The voxel engine detects that, and immediately stops uploading meshes, thinking it has done too much. As a result, typically only one mesh ends up being uploaded each frame, which is ridiculously low. We could lift the time limit, but if it were to continue running tasks, it would start stuttering due to overshooting the 16ms limit of the frame.
When one workaround is used, like enabling verbose_stdout, this slowdown completely disappears. Instead, the "delay" moves at the end of the frame. This has been linked to a debugging OpenGL extension getting turned on.
For more information, see Godot issue #52801.
Slowdown when moving fast with Vulkan
Issue
If you move fast while near a terrain with a lot of chunks (mesh size 16 and high LOD detail), the renderer can cause noticeable slowdowns. This is because Godot4's Vulkan allocator is much slower to destroy mesh buffers than Godot 3 was, and it does that on the main thread. When you move fast, a lot of meshes get created in front of the camera, and a lot get destroyed behind the camera at the same time. Creation is cheap, destruction is expensive.
This was observed by profiling with Tracy in a release_debug build (typical mode used for official optimized builds):
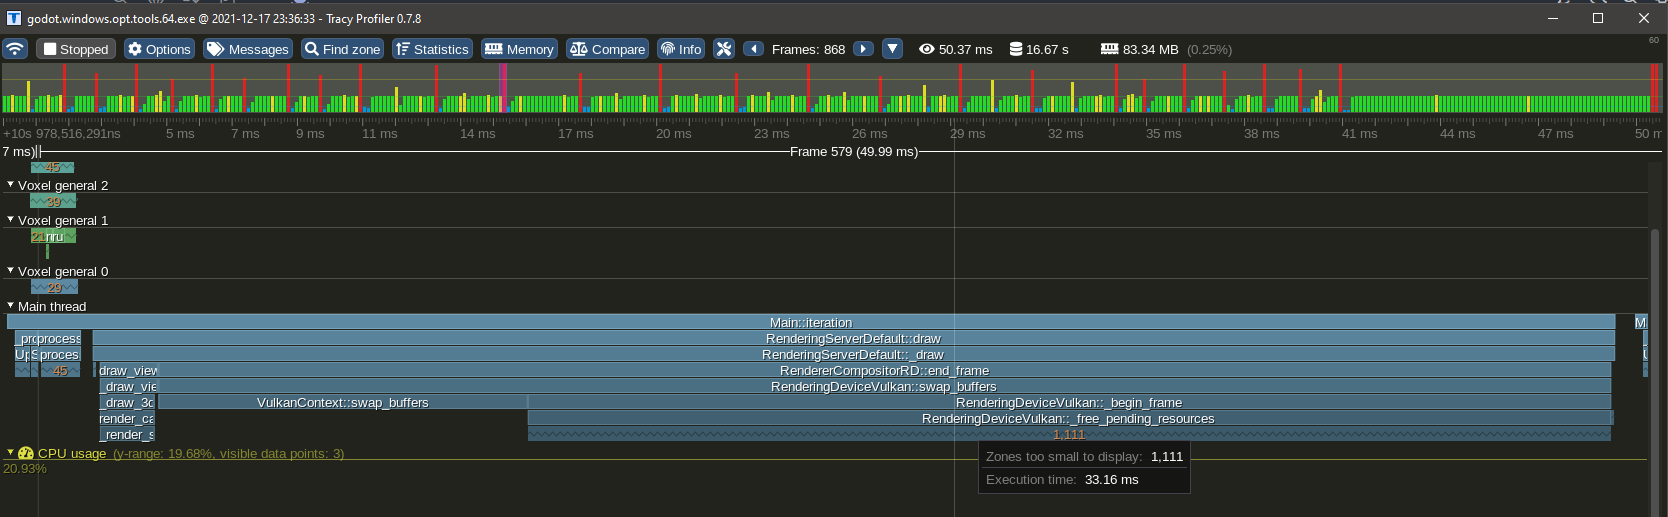
Lots of buffers get freed on the main thread at the end of the frame, and it can take a while, causing a CPU spike. On the other hand, there is no such issue when the same amount of meshes is allocated. This issue also was not noticeable in Godot 3.
This problem reproduces specifically when a lot of small meshes are destroyed (small as in 16x16 pieces of terrain, variable size), while a lot of them (thousands) already exist at the same time. Note, some of them are not necessarily visible.
Workarounds
It is not possible for the module to just "pool the meshes", because when new meshes need to be created, the API requires to create new buffers anyways and drops the old ones (AFAIK). It is also not possible to use a thread on our side because the work is deferred to the end of the frame, not on the call site.
A mitigation is in place to smooth the spikes by spreading the amount of destroyed meshes over time, but the slowdown is still noticeable.
The only workarounds involve limiting the game:
- Increase mesh block size to 32 to reduce their number, at the expense of edition cost
- Limit the speed at which the player can move when close to voxels
- Reduce LOD distance so less blocks have to be destroyed, at the expense of quality
Physics
The voxel engine offers two different approaches to physics:
- Standard Physics: the official API Godot exposes through PhysicsServer3D (Godot Physics, Godot Jolt...).
- Box Physics: a small specialized API that only works with axis-aligned boxes on blocky terrain, exposed with VoxelBoxMover and voxel raycasts. It is much more limited and requires some setup, but performs faster.
Standard Physics
Mesh colliders simulation
Similar to rendering 16x16x16 or 32x32x32 blocks, the voxel engine uses "mesh" colliders for every terrain block (or "chunk"). These colliders are static and can be concave. Therefore, any terrain shape should be supported, but depends a lot on how performant these colliders are in the underlying physics engine.
Moving terrain remains possible, but do not expect physics to work correctly on the surface while moving it.
Tunnelling
Mesh colliders used by terrain have no "thickness". An object can sit undisturbed outside or inside of it, contrary to convex colliders which usually have a "depenetration force" pushing objects away from their inside. This makes mesh colliders more prone to "tunneling": if an object goes too fast, or is too small relative to its velocity, it can pass through the ground.
- Limit speed of your objects
- For fast-moving objects (projectiles?), use elongated shapes, or just raycasts, making sure that the "trail" of the shape "connects" between each physics frame
- Enable Continuous Collision Detection, if the physics engine supports it
- Check voxel data to find out if a point is underground and move up the object
Shape creation is very slow
Similar to rendering, the voxel engine has to convert voxels into meshes ("meshing"), and does this with our own prioritised pool of threads. It will use those meshes as colliders. Creating a collider from a mesh is actually much more expensive than meshing itself (about 3 to 5 times), because it involves creating an acceleration structure to speed up collision detection (BVH, octree...).
Unfortunately, Godot does not offer a reliable way to safely create these shapes including their acceleration structure from within out meshing threads. So instead, we had to defer it all to the main thread, and spread it over multiple frames. This slows down terrain loading tremendously (compared to disabling collisions).
- A proposal has been opened to expose this issue, still not addressed
- Godot Jolt also has this issue, exacerbated by the fact it was implemented to defer shape setup to the very last moment, when entering the scene tree. So even if we were allowed to create mesh colliders from our threads, it still defers all the hard work to the main thread.
Voxel Iteration order
In this engine, voxels are stored in flat arrays indexed in ZXY order. Y is the "deepest" coordinate: when iterating a VoxelBuffer of dimensions (size.x, size.y, size.z), adding 1 to the Y coordinate is equivalent to advancing by 1 element in memory. Conversely, adding 1 to the X coordinate advances by size.y elements, and adding 1 to the Z coordinate advances by (size.x * size.y) elements.
Therefore, for cache locality, iterating voxels is best done in this order:
for z in size.z:
    for x in size.x:
        for y in size.y:
            var v := buffer.get_voxel(x, y, z, channel)
            # ...
The only reason for this particular choice was that most games use Y as the vertical coordinate, so some operations can be done quickly alongside the vertical axis. It was decided in early days of the project and was kept for consistency. But generally, this convention should only matter if you are working on low-level code.
GDScript
GDScript is already quite slow to perform intensive operations such as doing 3D for loops to process voxel buffers with complex conditions. You may use it that way for prototyping, but it is not scalable. Another approach is to use it as a "logic glue" to compose lower-level functions together that do the expensive work, such as VoxelTool or VoxelBuffer methods, or delegating to graphs.
It also suffers from a significant performance penalty when used inside multiple threads in editor tests. This is especially relevant when implementing VoxelGeneratorScript for example. When run from the editor, Godot uses debug synchronization primitives that hugely slow down function calls, to the point using less threads could make your code faster. This issue is not present in exported builds.
Access to voxels from different threads
This section explains in more detail how multithreading is implemented with voxel storage, and what are the implications when you access and modify voxels.
The problem
Up to version godot3.2.3 of the module, reading and writing to voxels did not care about multithreading. It was possible to access them without locking, because all the threaded operations using them (saving and meshing) were given copies of the voxels, made on the main thread.
This made things simple, however it causes several issues.
- If threads are unable to consume tasks faster than they are issued, copies of voxel data will keep accumulating rapidly and make the game run out of memory.
- Copying blocks and their neighbors takes time and is potentially wasteful because it's not guaranteed to be used.
- It assumes the threaded task will only need to access a specific block at a fixed LOD, which is not always the case in other voxel engines (such as UE4 Voxel Plugin by Phyronnaz). For example, Transvoxel running on a big block may attempt to access higher-resolution blocks to better approximate the isosurface, which is not possible with the current approach.
Internal changes
The old design starts to change in version godot3.2.4. Copies aren't made preemptively on the main thread anymore, and are done in the actual threaded task instead. This means accessing voxels now require to lock the data during each transaction, to make sure each thread gets consistent data.
Locking is required if you access voxels which are part of a multithreaded volume, like a terrain present in the scene tree. You don't need to if you know the data is not used by any other thread, like inside generators, custom streams, known copies or other storage not owned by an active component of the voxel engine.
RWLocks per VoxelBuffer
The locking strategy was initially implemented by adding an RWLock on every VoxelBuffer. Such locks are read-write-locks, also known as shared mutexes.
While simple, this method meant that if you had a 16x16x16 loaded terrain area containing voxels, you'd have to allocate 4,096 RWLocks from the system, and lock them all if a region needed to be accessed. For example, updating a mesh means accessing a block and its 26 neighbors, so 27 locks. They also had to be locked in a specific order, because two threads trying to lock multiple blocks in different order would lead to a dead-lock, freezing the game.
RWLock is also quite heavy on Windows, taking 244 bytes (half of the base data structure for data blocks).
Besides, certain platforms (such as consoles or mobile systems) might not allow creating that many locks.
Spatial lock (17/06/2023)
Later on, RWLocks were removed from VoxelBuffer. They were replaced with SpatialLock3D.
A spatial lock is just a list of boxes protected by a mutex. If you want to read voxels in a specific area, try adding that box to the list, and remove it once you're done. If you want to also write voxels, tag that box as "write mode".
The spatial lock will block locking attempts if an existing box in "write mode" is intersecting yours, while allowing multiple "read mode" boxes to overlap. It essentially acts the same as RWLock, except only one short-duration mutex is used to protect the list, and there is no need for thousands of them to exist.
This approach requires the same amount of locks regardless of the size of the box.
Read and write
Multiple threads can read the same block, but only one can modify it at once. If a thread wants to modify the block while it is already locked for read, the thread will be blocked until all other threads finished reading it. This can cause stutter if done too often on the main thread, so if it becomes a problem, a possible solution is to lock for read, copy the block and then modify it (Copy-on-Write). Another solution is to run expensive modifications in a thread and use "try lock" instead of "lock", delaying the task instead of blocking the thread.
Editing voxels efficiently
This matters for scripters.
If you use VoxelTool, all locking mechanisms are handled for you automatically. However, you must be aware that it doesn't come for free: if you want to access voxels randomly and modify them randomly, you will pretty much get the worst overhead. If you want to access a well-defined region and you know where to read, and where to write ahead of time, then optimizing becomes possible.
For example, on a terrain node, VoxelTool.get_voxel or set_voxel are the simplest, yet the slowest way to modify voxels. This is not only because of locking, but also because the engine has to go all the way through several data structures to access the voxel. This is perfectly fine for small isolated edits, like the player digging or building piece by piece.
This is what happen when you change a single voxel in a terrain (as of 17/06/2023. May also vary depending on the operation and terrain configuration):
- Your voxel position is converted into block coordinates
- The map containing blocks is locked (so we are sure nothing else modifies it as we access it)
- The block is queried. If it isn't loaded, the edit will fail as "area not editable".
- If the block is loaded but does not cache voxel data (in some configurations, non-edited blocks do not store data), the whole block will be generated on the spot using
VoxelGeneratorand modifiers and will be inserted in the map. - The map containing blocks is unlocked
- The block itself gets locked in Write mode. Nothing else can access it. If something else is already using the block, the current thread will block until it unlocks.
- Your voxel position is converted into block-relative voxel position and bound-checked
- The voxel channel is accessed: if it contains no voxel data due to the whole block containing the same value (optimization), data will get allocated so that the voxel you are modifying can take a different value.
- The channel's format is checked: coming from a script, the value you pass could be a 64-bit integer or a float, but channel data may be 8, 16, 32 or 64 bits with various encodings. By default, it is 16 bits, so the value may get clamped and encoded.
- The value actually gets stored
- The block is unlocked and marked as modified
- The terrain is notified that a change occurred in the block you edited.
- If the terrain has a mesher, a re-meshing task will be scheduled (if not already done so far) to update visuals and maybe collisions.
- If the terrain has a network synchronizer, it will schedule an "area changed" RPC message.
- If the terrain has a VoxelInstancer, it will check if instances lost contact with ground.
As you can see, a lot is going on with a single voxel. Repeating this all over for many voxels is not efficient. That's why bulk edits may be preferred, because a lot of these operations will happen only once for the whole edit, an the only thing that will get executed many times is the actual voxel data changes.
If you want to excavate whole chunks or generating structures, try to use specialized bulk functions instead, such as do_sphere(), do_box(), raycast or paste(). These will be more efficient because they can cache data structures on the way and perform locking in the best way they can.
If your changes are very custom or depend on a lot of pre-existing voxels, you can use copy() to extract a chunk of voxels into a VoxelBuffer so you can read them very fast without locking. You can even choose to do your changes on that same buffer, and finally use paste() when you're done.
Tuning VoxelGeneratorGraph
VoxelGeneratorGraph uses a number of optimization strategies to make the calculations faster. You may want to fine-tune them in some cases depending on the kind of volume you want to generate, although it should run ok by default. When you get more familiar with the tool it may be useful to know how it works under the hood, notably to troubleshoot generation issues when they occur.
Buffer processing (CPU)
Contrary to many node-based or expression tools existing in Godot so far, voxel graphs are not tailored to run on voxels one by one. The main use case is to process a bunch of them. Indeed, for a 16x16x16 block, there are 4096 voxels to generate. That would mean traversing the entire graph 4096 times, and the cost of doing that individually can exceed the cost of the calculations themselves. Besides, switching constantly between node types to run different operations is not CPU-friendly due to all the jumps required.
So instead, outputs of each node are associated small buffers for a subset of the voxels, say, a 16x16 slice. Then, the graph is traversed once ahead-of-time to obtain a simple list of operations. It is guaranteed that if a node depends on another, the other will have run before.

Finally, the generator executes the list, node by node, and each node computes a bunch of voxels at once instead of just one. This ensures that the CPU is almost exclusively used for the operations themselves, providing performance similar to C++, while graph traversal becomes neglibible. It also offers the opportunity to use SIMD very easily, which can be even faster than if the code was written in plain C++.
Buffer processing is mostly an internal detail so there are no particular settings on the scripting API.
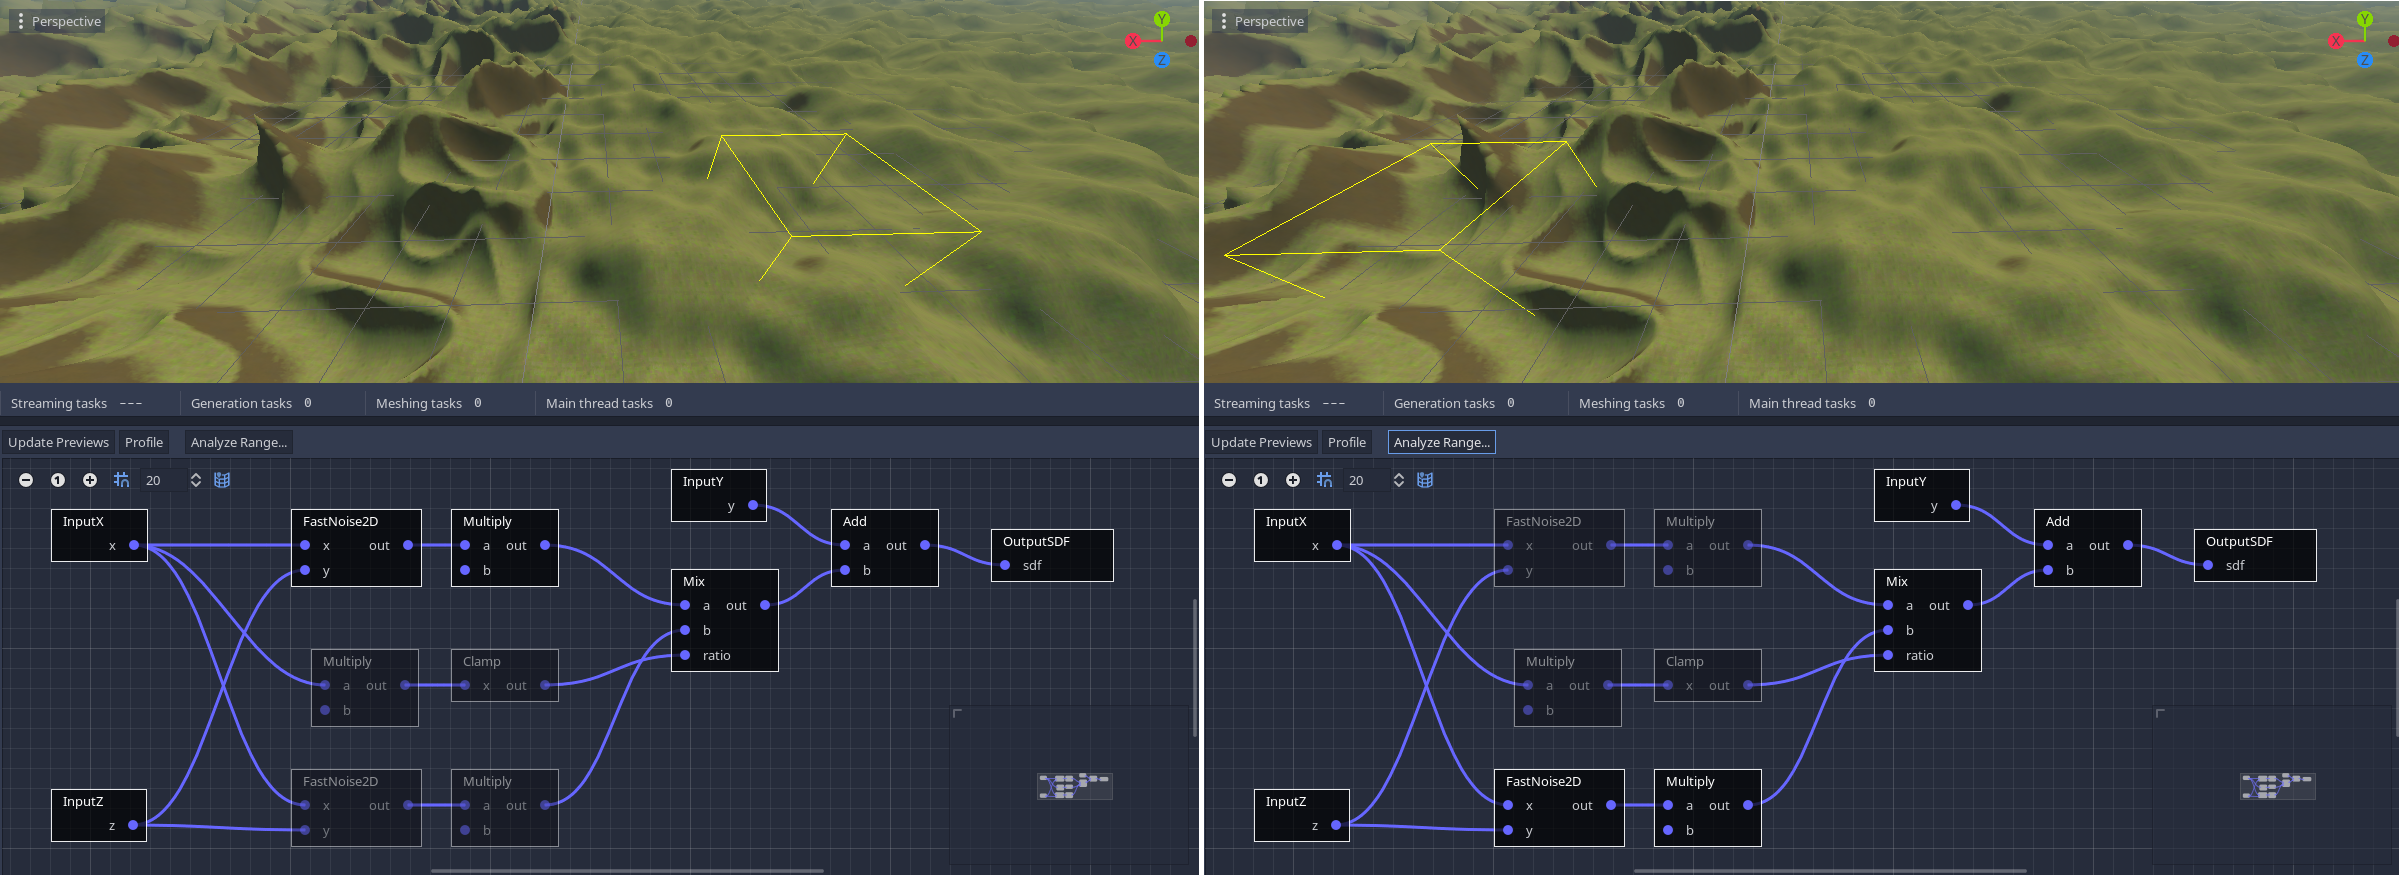
Range analysis (CPU)
Before processing voxels in a specific region of space (a box), the generator first runs a range analysis pass. Each node has an alternative implementation using intervals, with the sole purpose of estimating the range of values it will output in the area. It's like a broad-phase before the heavy work.
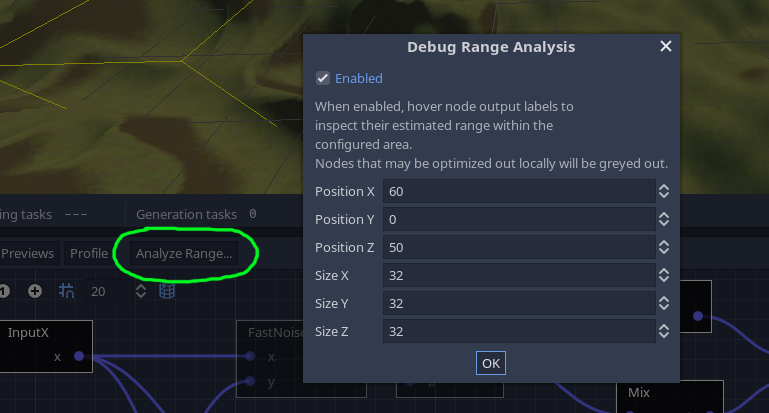
It is possible to inspect results of this pass in the editor by enabling it with the Analyse range button. The analysis will focus on the box specified in the dialog, which will appear as a yellow wireframe in the 3D viewport.
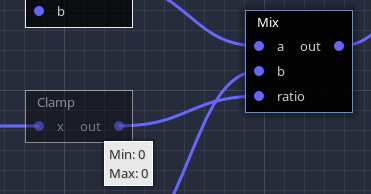
You can also hover the output label of any node to see what range was calculated for it:
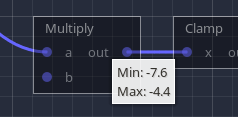
Note
Noise is typically between -1 and 1, but we take it a step further. Ranges are approximated using maximum derivatives, which is how fast noise can vary along a given distance. Each noise algorithm has its own. We calculate noise at the center of the box, and add half of the maximum derivative, positively and negatively. In other words, in the box, we know noise cannot exceed the central value + the maximum variation along extents of the box. At close range, this can successfully detect valleys and hills, without fully computing them.
Results of this pass are used for several optimization techniques described below.
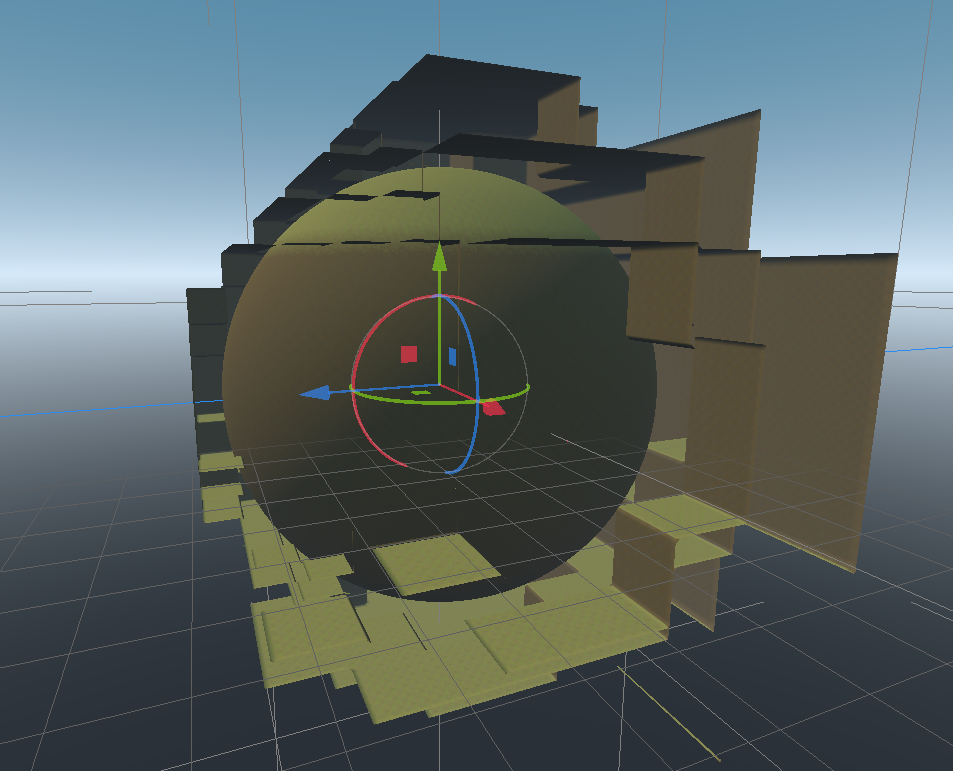
SDF clipping (CPU)
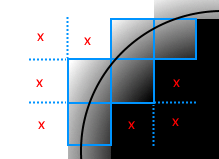
3D volumes represented with meshes to form a terrain have an interesting property: to generate them, we are mostly interested in the areas where voxel values are crossing the isolevel (zero). That means we could completely discard regions of space that are guaranteed to never get near zero, and simplify them to a single value (like "only matter" or "only air"). Doing that in 3 dimensions has tremendous speed implications so it is a major feature of this generator.
Range analysis is used to perform this optimization. In a given area, if the maximum value of SDF is lower than a threshold below zero, then the whole block is skipped and assigned a uniform negative value. The same happens with a threshold above zero.
It is possible to choose that threshold with the sdf_clip_threshold property in the inspector. If given an extremely large value like 10000, it will essentially turn off this optimization.
It is exposed because in some situations, clipping can cause artifacts when the edge of a block is too close from a clipped one. Indeed, clipping blocks cause discontinuities in the distance field.
Usually they happen far enough from the surface to be of any concern, but sometimes they can come close if the threshold is too low:

So by default the threshold is above zero and should cover most cases.
It is also possible to instruct the generator to invert clipped blocks, which will make them stand out:
Local optimization (CPU)
Conditionals (if/else) are not supported by this voxel graph implementation. The main reason is because of the buffer processing approach. The CPU can churn through buffers very fast, but branching on a per-voxel basis would disrupt it. Besides, range analysis might get a lot more complicated if branching was added. They can exist within nodes, but cannot exist as a graph-level primitive. So the usual approach is to blend things by mixing, adding, subtracting parts of the graph. But when a graph becomes big, even with SDF clipping, performance could be better. Conditionals are often used to optimize locally, so how can we do this without?
Let's consider an example world made of two biomes, each generated with a big node setup, and blended together across the world's X axis.
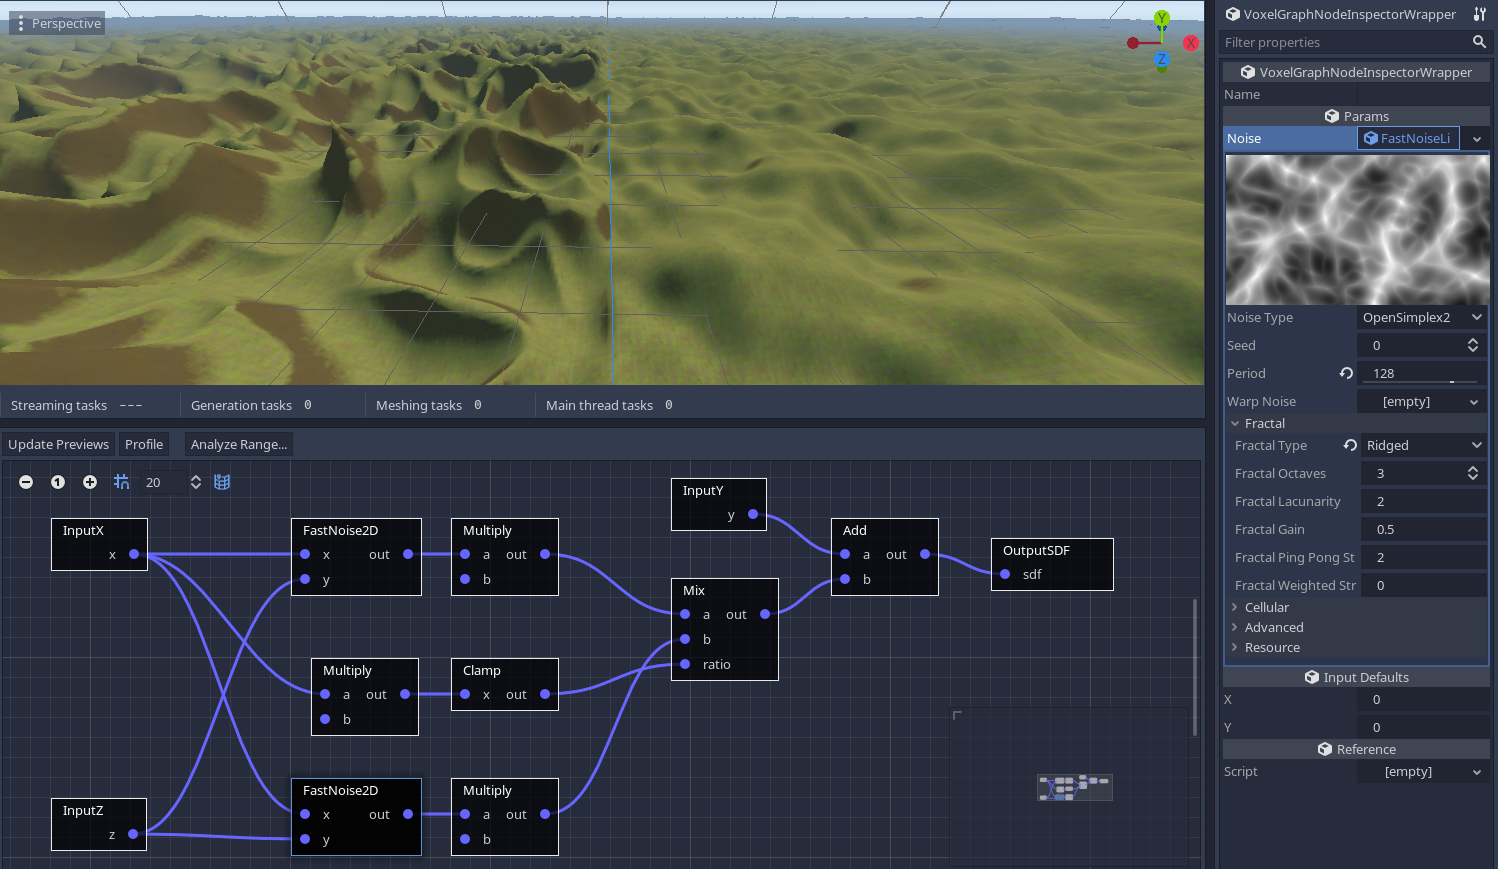
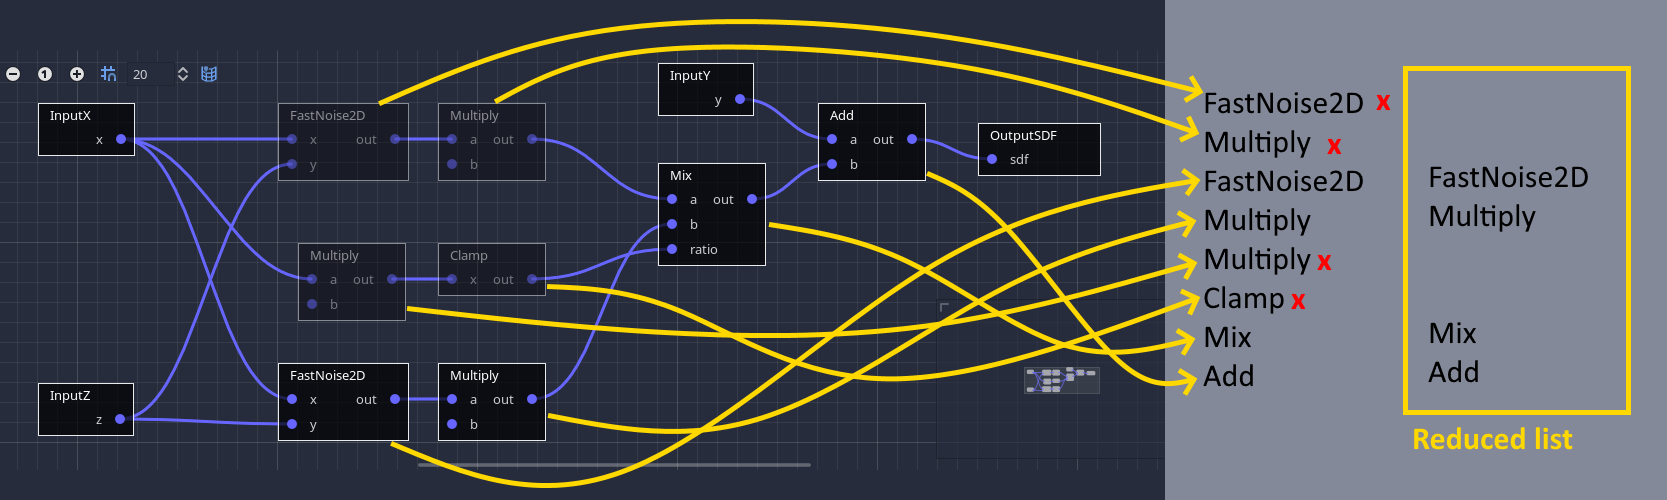
If we don't optimize this, both biomes will constantly get calculated at every point of space close enough to the surface. But if we look at the range analysis we performed earlier, and focus on one of the biomes, we notice that the range of values received by the Mix node are such that only one biome is blended. In other words, one of the inputs of Mix has no effect on its result, and is therefore ignored there.
So each biome then only computes its own branch when far away enough from the blending area:
Thanks again to range analysis, the generator is able to detect this locally, and dynamically skips whole branches of nodes if they are found to not affect the final result. Therefore, it is not required to add conditionals for this use case, it's done automatically. You can visualize this by turning on the analysis tool, which will grey out nodes that are ignored in the specified area.
Internally, the generator parses the graph locally (using a faster data structure since the graph is compiled) to obtain an alternative list of operations. This list is currently nicknamed an execution map, because it maps the full list of operations to a reduced one.
This setting can be toggled in the inspector.
Note
This feature may be more or less precise depending on the range of values parts of the graph are producing. So it is possible that two different graphs providing the same result can run at different speeds. For this reason, analysing ranges can prove useful to understand why parts of the graph are still computed.
Subdivision (CPU)
Previous optimizations are tied to the size of the considered area. The bigger the area, the less precise they will be. For example, with a larger box, it is more likely to find a place where voxels produce a surface. It is also more likely for more biomes or other shapes to appear and blend together. Besides, changing the size of our world chunks isn't a light decision.
So a simple improvement is to tell the generator to further subdivide itself the region of space it works on. Usually a subdivision size of 16x16x16 is ok. 8x8x8 is even more precise, but below that size the cost of iteration will eventually exceed the cost of computations again (see Buffer processing). Subdivision sizes must also divide volume block sizes without remainder. This is mostly to avoid having to deal with buffers of different sizes.
XZ caching (CPU)
When generating voxel-based terrains, despite the attractiveness of overhangs, there can be a large part of your generator only relying on the X and Z coordinates. Typically, generating from 2D noise as a base layer is one of these situations. When the generator is done with a slice along X and Z, it increases Y and does the slice above. But since 2D noise only depends on X and Z, it would get recomputed again. And noise is expensive.
This situation is similar to the following pseudocode:
for z in size_z:
    for x in size_x:
        for y in size_y:
            set_voxel(x, y, z, noise2d(x, z) + y)
Typically, to optimize this, you would move out the noise2d call into the outer loop, like so:
for z in size_z:
    for x in size_x:
        n = noise2d(x, z)
        for y in size_y:
            set_voxel(x, y, z, n + y)
This way, the 2D noise is only computed once for each column of voxels along Y, which speeds up generation a lot.
In Voxel Graphs, the same optimization occurs. When the list of operations is computed, they are put in two groups: XZ and XZY. All operations that only depend on X and Z are put into the XZ group, and others go into the XZY group.
When generating a block of voxels, the XZ group is executed once for the first slice of voxels, and the XZY group is executed for every slice, re-using results from the XZ group.
This optimization only applies on both X and Z axes. It can be toggled in the inspector.
Buffer reduction (CPU)
The graph attempts to use as few temporary buffers as possible. For example, if you have 10 nodes processing before the output, it won't necessarily allocate 10 unique buffers to store intermediary outputs. Instead, buffers will be re-used for multiple nodes, if that doesn't change the result. Buffers are assigned ahead-of-time, when the graph is compiled. It saves memory, and might improve performance because less data has to be loaded into CPU cache. This feature is disabled when the graph is compiled in debug mode, as it allows inspecting the state of each output.
GPU
Earlier sections were related to the CPU backend of VoxelGeneratorGraph. There is a GPU backend, which runs very differently. None of the CPU optimization settings apply to that backend.
The GPU backend will generate a compute shader for each kind of usage (at time of writing: chunk generation, and detail texture rendering). These compute shaders are dispatched from a separate RenderingDevice, in a background thread, so while they use the graphics card, they usually don't lead to framerate drops. You can see the generated code using the Generate Shader menu in the graph editor.
Shader compilation is done on a separate thread as well, and can take a while depending on the complexity of your graph. It can be noticed if the first chunk takes an unusual amount of time to generate.
If you notice this but still want to use the GPU backend, you may simplify your graph:
- Reduce the number of noise nodes, in particular FastNoiseLite. While this node gets the same results as the CPU version, it's a huge library in regard to shaders, and the more calls there are, the more complex compilation will get (either from GLSL to SPIRV, but also from SPIRV to GPU-specific format).
- Use less complex noise types. Cellular kinds are more costly.
- Replace noise nodes with image nodes that seamlessly repeat, i.e bake noise up-front. This is also faster to execute, at the cost of eventual repetition. Combining them at different rates can make it less obvious.