Blocky terrains
This page focuses more in detail on blocky terrains, Minecraft-like, or made of cubes.
VoxelMesherBlocky with models
This mesher combines small meshes corresponding to model IDs into chunks. It culls faces occluding each other, but doesn't do greedy meshing. This is a similar technique used in Minecraft.
Voxel data used by this mesher may be stored in the following channel: VoxelBuffer.CHANNEL_TYPE
Creating voxel models
The mesher has a library property of type VoxelBlockyLibraryBase. This is a resource containing a list of all the models you want to use in order to build a voxel mesh: grass, dirt, wood, leaves, water, shrubs, stairs, door parts etc. You can create a new library in place, or make one saved to a file if you want to re-use it in several places. You can also create it from code.
There are two kinds of libraries that can be used:
VoxelBlockyLibrary: a simple list of models, where the index in the list corresponds to the ID to use in voxel data.VoxelBlockyTypeLibrary: a higher-level library storing a list ofVoxelBlockyType. This is an experimental workflow similar to how Minecraft works, which will be explained later.
It is easier to get started with VoxelBlockyLibrary.
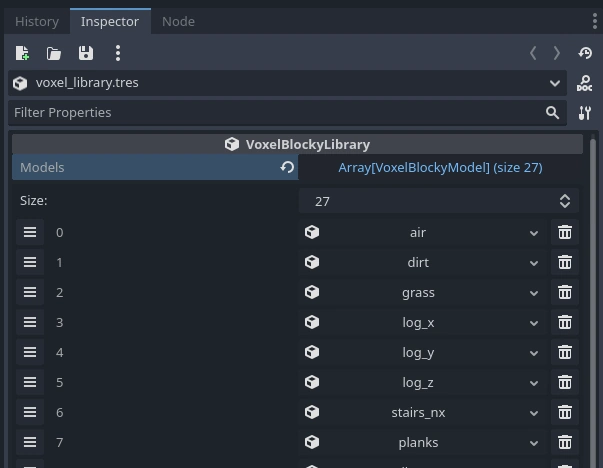
Each slot can contain a VoxelBlockyModel resource. The index shown on their left will be the ID they use in voxel data. Voxel 0 is a special case: by convention, it may be used as the default "air" voxel. You may assign a new VoxelBlockyModel resource to each slot, and fill in their properties.
With default 16-bit voxel data, you can create up to 65,536 models.
Warning
To allow conversion from older versions of the module, VoxelBlockyModel can be instanced, which means the inspector and scripts can create it. However, it is not actually expected. You should not create instances of VoxelBlockyModel, instead you should use its derived classes.
Cubes
There are several kinds of models. A simple one is VoxelBlockyModelCube, which renders a cube with specific textures on its sides.
With VoxelMesherBlocky, using texture atlases is recommended to allow re-using materials and reduce the number of draw calls. You can create a texture containing all the tiles your voxels can use. For example, here is one from the blocky game demo:
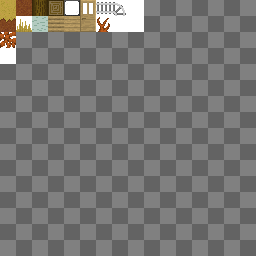
This atlas is a square texture and can contain up to 16x16 tiles. This number is important and needs to be set on the VoxelBlockyModelCube atlas_size_in_tiles property, so texture coordinates can be generated properly.
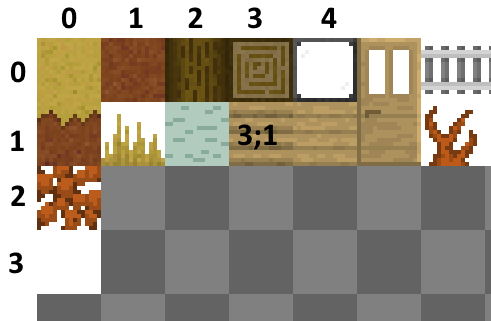
Cube models can have different tiles on each of their faces. You can decide which one to use by assigning properties of Voxel, under the Cube tiles category. Coordinates here are in tiles, not pixels.
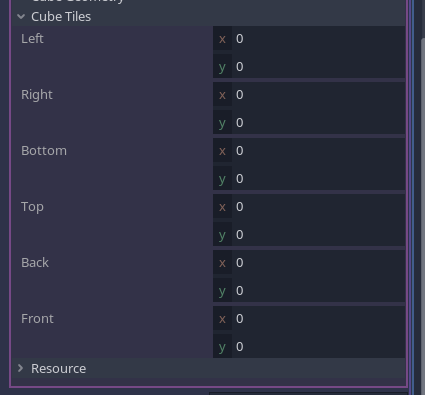
For example, if you want to use the "planks" tile, you may use x=3 and y=1:
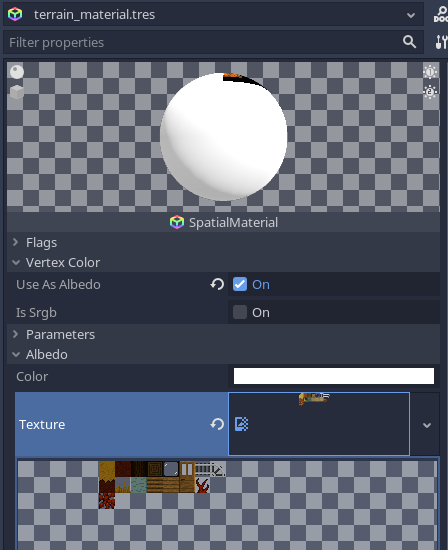
So far we defined a cubic voxel with specific texture coordinates on its faces, but we still have to actually assign the texture and material used to render it. This can be done in the Material overrides section, in which you can assign a material with the texture in it.
Make sure to assign its albedo_texture to your texture. You may also check the Vertex Color/Use as albedo property, because this will allow the mesher to bake ambient occlusion on the edge of cubes.
Each model can use different materials with different textures, but keep in mind the more you re-use materials, the better. It reduces the number of draw calls and makes rendering faster.
Note, there are several levels at which materials get applied, each one overriding the other:
- Materials present on meshes are the default (if you use meshes explicitely)
- Materials specified on VoxelBlockyModel will override mesh materials
- The material specified on VoxelTerrain will override all library materials
Meshes
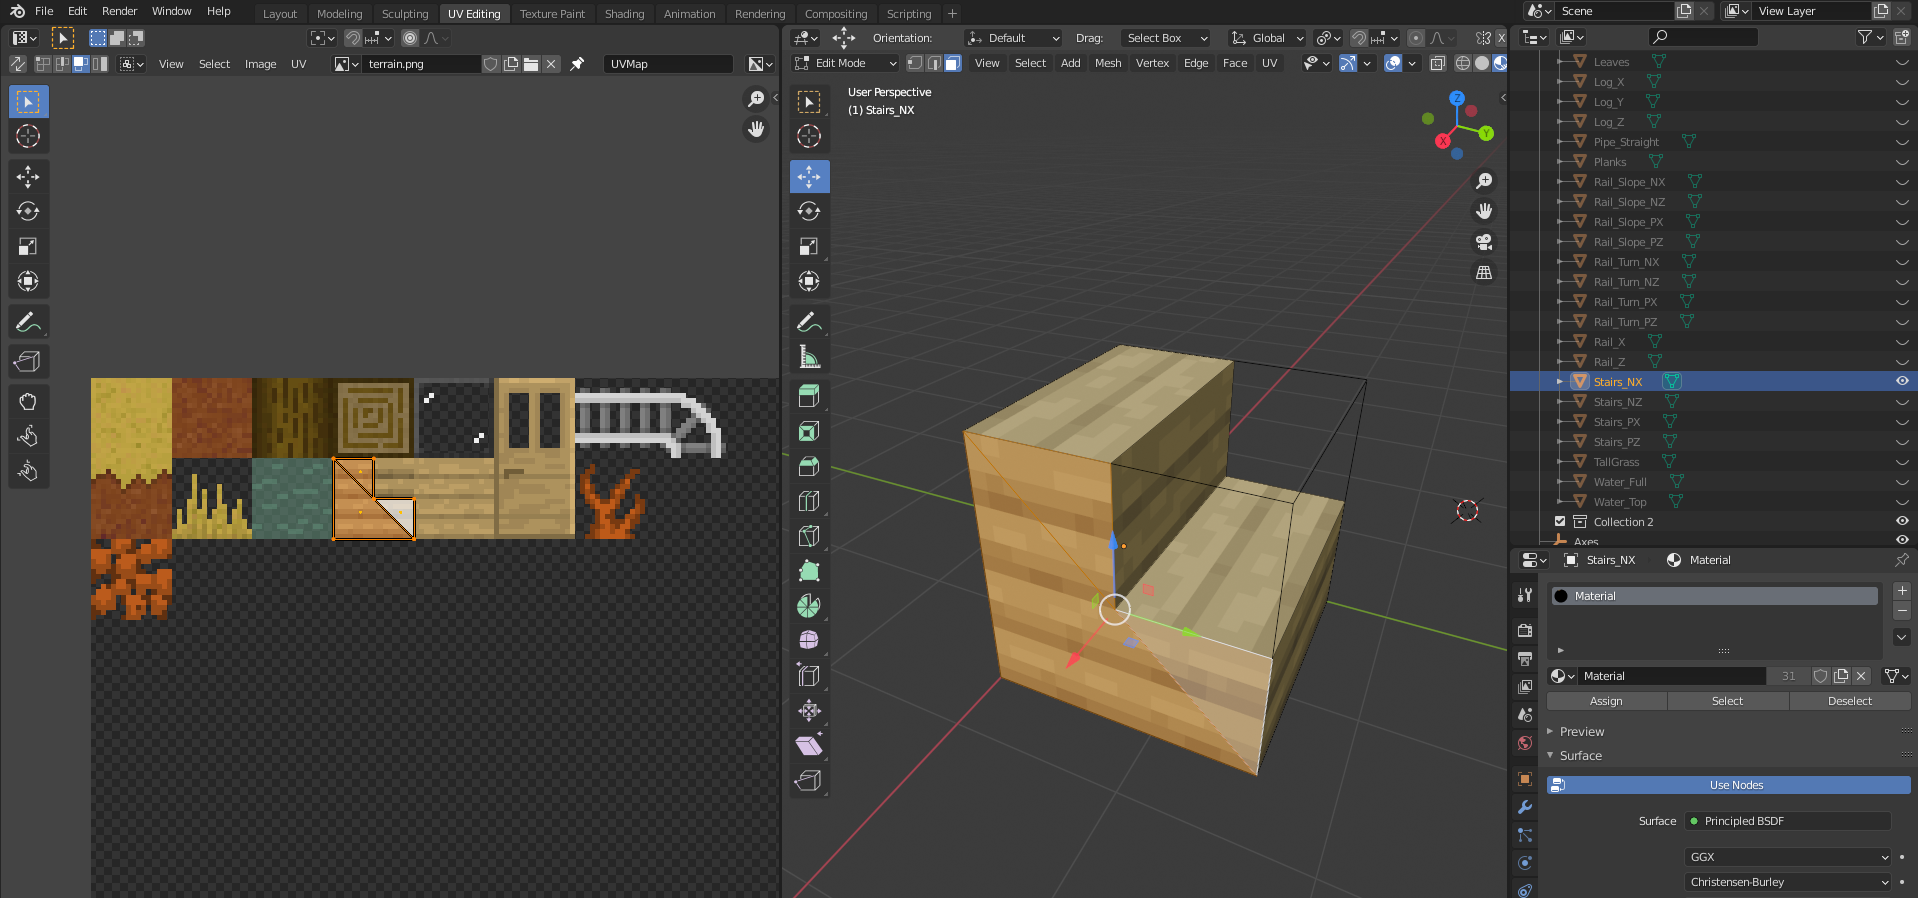
Creating voxel types with the Cube geometry is a shortcut that can be used for simple voxels, but the most versatile workflow is to use actual meshes. If you use VoxelBlockyModelMesh, you are allowed to assign a mesh resource instead. The Cube tiles properties are not available, because you will have to assign texture coordinates of the mesh within a 3D modeler like Blender.
Meshes can have any shape you want, however there are a few constraints to respect:
- The origin of the mesh should be its lower corner.
- Blender's coordinate system is Z-up, but Godot is Y-up. Make sure the meshes you export don't go into negative coordinates once imported in Godot.
- Vertices should preferably be located within the 0..1 range, in all directions
- Keep it low-poly. The mesher can deal with large models, but performance can decrease very quickly if a complex model appears a lot of times.
- Faces lying on the sides of the 1x1x1 unit cube will be the only faces that can be culled by the mesher. Make sure they are perfectly lining up. If they don't, it can cause dramatic slowdowns due to the amount of generated geometry not getting culled.

The best format to use to export your meshes is OBJ. Godot imports this format by default as a mesh resource. Other formats are not suitable because Godot imports them as scenes, and VoxelBlockyModelMesh resources require meshes, not scenes.
You can choose to export materials from here too, but it is recommended to do it in Godot because it allows you to re-use them.
Note
A second material can be used in each model. This is useful if a given mesh needs both transparent and opaque parts. This works as usual, by having a mesh with two surfaces. However, face culling will still use properties of the model regardless. For example, if a model has opaque sides and is transparent in the middle, it may be defined as a non-transparent block, so when placed next to other opaque blocks, geometry of its sides will be culled. See Transparency section for more info.
Warning
If your voxels use mesh-based physics (GodotPhysics, Jolt...) and you export your game with "Export as dedicated server" in the resources tab of an export preset, make sure meshes you used in VoxelBlockyModelMesh are not stripped. Mesh data is required at runtime to generate colliders. If you don't do this, models using a mesh will not generate any mesh-based collision.
Fluids
If you need to make flowing water with different levels and a similar style as Minecraft, VoxelBlockyModelFluid is available. Top corners of fluid voxels will be raised to match the highest neighbor fluid of the same type.
This is a procedural model, so less data is precomputed and is instead calculated by the mesher on every block update. This is because when fluids have more than a few levels, precomputed models would require so many variations that it wouldn't be worth it.
Note
Like the rest of models, fluids won't simulate behavior on their own. That part is for you to implement.
Library setup
Fluid models works a bit differently than regular models. First you have to create a VoxelBlockyFluid resource, and save it as a .tres file.
Then, in your library, create a VoxelBlockyModelFluid for every level your fluid has, setting their fluid and level properties accordingly. It may be convenient for each level to have consecutive IDs, but it is not required.
It is important that you share the same fluid on the fluid property (which is easier if the fluid resource is a file). This way, the mesher will recognize each model as part of the same fluid.
To avoid issues with side culling, make sure fluid models also have a transparency_index higher than solid blocks.
Material setup
VoxelBlockyFluid has a material property, which will be used for every model part of that fluid.
In order to flow in the right direction and animate, you have to use a ShaderMaterial with a special shader. Instead of filling UV with texture coordinates, the mesher will store flowing information:
UV.x= which axis to project textures on. 0=x, 1=y, 2=z (this could also be deduced from the vertex normal).UV.y= flowing state. Tells which direction the flow is going, or if it's not moving.
| Flow state | Value |
|---|---|
| Straight +X | 0 |
| Diagonal +X -Z | 1 |
| Straight -Z | 2 |
| Diagonal -X -Z | 3 |
| Straight -X | 4 |
| Diagonal -X +Z | 5 |
| Straight +Z | 6 |
| Diagonal +X +Z | 7 |
| Idle | 8 |
Values are chosen such that they are proportional to an angle.

Based on this, it is possible to orient and animate a water texture, using local vertex coordinates instead to sample pixels (similar to triplanar mapping). This mostly matters for the top side of fluid voxels. Lateral sides will always flow down, and the bottom side will always be idle. It is up to you to tweak the shader if you want the result to look different, for example if you want flowing textures to be different than the idle texture.
TODO Example scene
Limitations
- The maximum number of levels is limited (see VoxelBlockyModelFluid API)
- The maximum number of fluids is limited (see VoxelBlockyLibraryBase API)
- Normals of the top side of fluid voxels remain the same as if it was flat. Only corner positions are displaced. As a result, shading of the top won't change with slope. This is currently not implemented for performance reasons, until a fast method is found (note: Minecraft seems to have done the same choice).
- Currently no backfaces are generated. In Minecraft, water actually has both backfaces and front faces, which are culled differently in certain edge cases. Currently the engine doesn't differenciate the two. A workaround people often try is to disable backface culling entirely in the water material, but that might lead to other issues. For more details, see issue 621
Usage of voxel model IDs
Voxel IDs defined in a VoxelBlockyLibrary are like tiles in a tilemap: for simple games, they can directly correspond to a type of block. However, you may want to avoid treating them directly this way over time. Instead, you may define your own list of block types, and each type can correspond to one, or multiple VoxelBlockyModel IDs.
Examples from Minecraft:
- Stairs can be placed at different orientations, and sometimes have different appearance. These are actually multiple voxel IDs.
- Crops can have several growth stages. Each stage is a different voxel ID, for the same type of block.
- One door is actually made of 2 voxels. Its top, and bottom. There could be even more if we consider opened and closed doors.
- One rail can correspond to many different voxels: straight rails, slopes, and turns. They are all rails, but in different sub-configurations.
Managing the correspondance between your "game's block" IDs and voxel IDs is up to you.
Rotating models
At the moment, rotating or flipping voxels automatically is not supported, so you have to create each rotated version you may need for a type of voxel. However it is possible to create these model variants in the editor, by using the rotation buttons in the inspector:
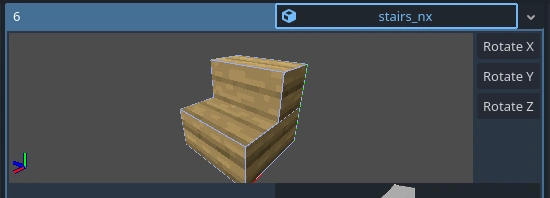
These buttons are not for previewing, they actually rotate the model and it will appear in that rotation when placed in game.
Transparency
You may want some of your voxel types to be transparent. There is in fact two main ways to achieve this:
- Using alpha clip: transparent pixels are discarded, allowing rendering through the opaque pass, which avoids some typical issues with transparent surfaces.
- Alpha blend: actual transparency, which has a few limitations when multiple transparent surfaces are rendered behind each other
Both require to use a different material from the default one you may have used. Note if you use a texture atlas, a typical setup only needs 3 materials using the same atlas: opaque, alpha clip and transparent.
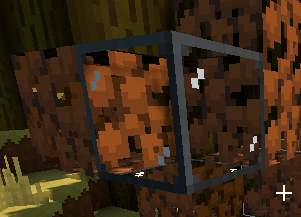
VoxelBlockyModel resources also have a transparency_index property. This property allows to tune how two voxels occlude their faces. For example, let's say you have two transparent voxels, glass and leaves. By default, if you put them next to each other, the face they share will be culled, allowing you to see through the leaves from the glass block:
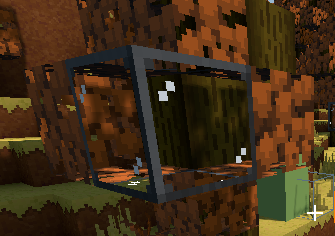
If two faces touch each other, if they have the same transparency index, they can get culled. But if their transparency index is different, they may not. This allows to see the leaves directly behind glass, instead of seeing the insides.
Here, glass has transparency_index=2, and leaves have transparency_index=1:
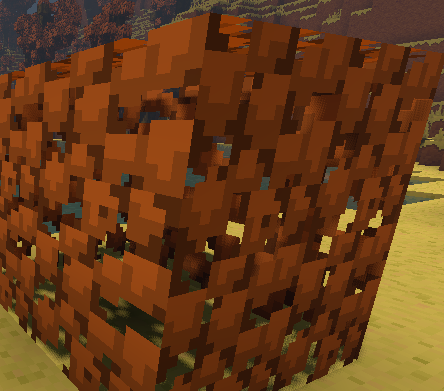
VoxelBlockyModel also has a culls_neighbors property. This is enabled by default and prevents unnecessary rendering of neighboring voxel sides. However, for some transparent voxels it may be more desirable to always render neighboring voxel sides. For example, foliage can be made to look denser if all of the inner voxel sides
are visible.
Here is a group of leaves with culls_neighbors=true (the default):
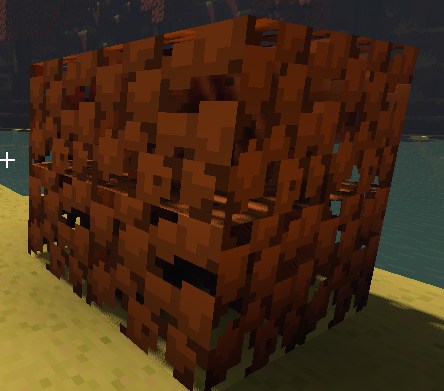
Here is that same group of leaves with culls_neighbors=false. The sides in-between the voxels are rendered, making the group of leaves look less hollow.
Culling limitations
While the blocky mesher will attempt to cull neighbor faces when they cover each other, it won't actually cut them out perfectly like CSG nodes. If you have two slabs touching each other on the side, both sides will be removed.

But if you have a cube touching a slab, the slab will be covered and its side will be culled, but the cube's side will still be half-visible. In this case the engine leaves triangles of the whole side visible. In other words, sides are either fully culled, or not culled (this also happens in Minecraft).

This is mainly because the engine doesn't have time to do full "CSG" on every possible combination of sides there can be when it meshes models into a chunk. Instead, it uses a matrix of precomputed bitmasks, so that telling if a face covers another is very fast. This is also one reason why models rotation or flipping is precomputed per model, because it eliminates a lot of work that boils down to simple lookups.
This can be problematic if models need transparency because it exposes the underlying geometry. There is currently no way to avoid it, other than not having this situation in the game. For example, in Minecraft, there are no glass slabs or staircases, and water flows such that model sides always match.
Another more minor detail is how matching faces are detected. During baking of the library, the engine uses rasterization to check if two sides have the same shape, so it can gather all shapes of the whole library and compare them all against each other quickly, generating a "culling" matrix that the mesher will be able to use. If you rely on very small triangles or very detailed faces, the result might not work out perfectly in certain cases.
Random tick
VoxelBlockyModel has a property named random_tickable. This is for use with a very specific function of VoxelToolTerrain: run_blocky_random_tick
VoxelMesherBlocky with types
Warning
This feature is experimental, may have bugs, missing parts and may change over time. It proposes a way to organize models for a game and automates a few things, but you may still use VoxelBlockyLibrary if you want to handle this in your own way. See also the corresponding issue on Github.
An alternative library type exists, VoxelBlockyTypeLibrary. Instead of directly containing a list of models, it contains a list of VoxelBlockyType. A type is closer to what you would call a "block type" in a game, and this system was designed to be very similar to how blocks are defined in Minecraft (inspiration from https://docs.minecraftforge.net/en/1.19.2/blocks/states/).
Attributes
A type can have a few VoxelBlockyAttribute. Each attribute is like a variable representing a state of the type. They could be the orientation of a log, a button being pressed or not, a block being the top or bottom part of a door, connections with neighbors, or the growth level of crops.
Types should usually have very few attributes, and each attribute can take only a few values as well (between 0 and 255). This limitation relates to the lightweight nature of voxels, you can't store too much into a single voxel otherwise it looses its ability to be part of a terrain with millions of them. If you need a block to have much more complex states, such as objects and lists of things, this system may not work for your case and you will have to fallback on using voxel metadata and actual nodes (like entities in Minecraft).
Variant models
After you assigned attributes to a type, the inspector will show you a list of models for every combination of states:
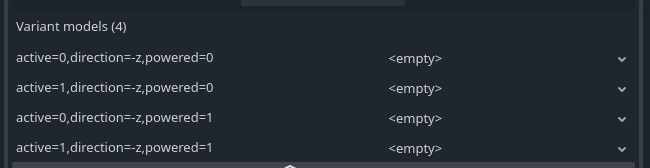
You can also preview combinations by using the side panel next to the type's 3D preview on top of the inspector.
If you have many attributes or many states, it is possible that this list becomes very large. In Minecraft, redstone dust technically has 1,296 model variants. It is therefore not made using a list of variants, but a conditional combination of models. In the future a similar feature may be implemented.
Rotations
A very common use for attributes are rotations. It is so common that VoxelBlockyType automates the generation of rotated models, if you use a built-in rotation attribute:
VoxelBlockyAttributeAxisVoxelBlockyAttributeDirectionVoxelBlockyAttributeRotation
Each rotation attribute comes with a default rotation, and you may design your models as if they had that rotation, so that every other rotation can be generated properly.
Because these variants are generated automatically, they won't be displayed in the inspector, but they are internally stored like other variants.
Note
It can be tempting to use VoxelBlockyAttributeRotation for everything, but it has the highest number of variants. The engine has to generate pre-rotated models for every combinations, so it has a cost in memory. Similarly, if you don't need certain rotations, consider changing properties of these attributes (you can exclude vertical rotations).
Model names and numerical IDs
The name of types and attributes matter. They are used to uniquely identify models, in the following form:
<type_name>[attribute1=value,attribute2=value,...]
For example, a particular voxel could be identified as button[direction=up,pressed=yes]. If you rename, remove or add an attribute causing this identifier to change, it will effectively become a different voxel, and may be given a different ID. That means if you have a saved world with the old names, those won't appear after you change the type.
A type can correspond to one, or multiple models with different numerical IDs. Contrary to VoxelBlockyLibrary, you don't choose those IDs. They are automatically generated based on all the combinations of all attributes you gave to each type. The more attributes and states a type has, the more model IDs will be reserved for it.
Once a particular model is baked, its name and attribute states will be associated to a specific numerical ID.
One reason numerical IDs are not manually assigned, is first because it's tedious to do without mistakes when you have many types, but also because of modding. In Minecraft, each world may have different numerical IDs for each voxel compared to other worlds, because of resource packs and mods that could be adding different models. Adding or removing mods should not make IDs clash with each other.
In the end, it is not the numerical IDs that uniquely identify a model. Instead, types and attribute names are used. Type names may even be namespaced with a syntax like minecraft:flower and mymod:thingy.
Numerical IDs are only unique within a specific world. They are used to store voxel data and send it across network, which is more efficient, but not portable across different worlds.
Numerical IDs and names are mapped with what we could call an "ID map". You can see a list of generated IDs by clicking on the Inspect model IDs at the very bottom of a VoxelBlockyTypeLibrary in the inspector.
Usage in scripts
When dealing with voxel data, you still need to get and set model IDs with VoxelTool, because that's what voxels actually store. If a voxel from a given type needs to change state, that means it will change value to another model ID, like you would do in a game based on the classic VoxelBlockyLibrary.
VoxelBlockyTypeLibrary has functions to obtain a model ID from a type name and the value of each of its attributes, and inversely. If you need specific IDs a large number of times, consider caching them in a local variable for performance.
Type names and attribute names use StringName instead of String, which is a little bit more efficient to compare against other names. So you will need to use a specific syntax using &:
var model_id := library.get_model_index_with_attributes(&"button",
    # Note that dictionary keys don't use `&`, because Godot converts StringName keys into String.
    {
        "direction": VoxelBlockyAttributeDirection.DIR_POSITIVE_X,
        "active": 1,
        "powered": 0
    })
If the type only has one attribute, you can use a faster shortcut:
var model_id := library.get_model_index_single_attribute(&"log", VoxelBlockyAttributeAxis.AXIS_Z)
And if the type has no attribute, or you just want its default state:
var model_id := library.get_model_index_default(&"leaves")
VoxelMesherCubes
This mesher exclusively generates cubes with specific colors.
TODO
Fast collisions alternative
Move and slide
Mesh-based collisions are quite accurate and feature-rich in Godot, however it has some drawbacks:
- Trimesh collision shapes have to be built each time the terrain is modified, which is very slow.
- The physics engine has to process arbitrary triangles near the player, which can't take advantage of particular situations, such as everything being cubes
- Sometimes you may also want a simpler, more game-oriented collision system
The VoxelBoxMover class provides a Minecraft-like collision system, which can be used in a similar way to move_and_slide(). It is more limited, but is extremely fast and is not affected by tunnelling.
The code below shows how to use it, but see the blocky demo for the full code.
var box_mover = VoxelBoxMover.new()
var character_box  = AABB(Vector3(-0.4, -0.9, -0.4), Vector3(0.8, 1.8, 0.8))
var terrain = get_node("VoxelTerrain")

func _physics_process(delta):
    # ... Input commands that set velocity go here ...

    # Apply terrain collision
    var motion : Vector3 = velocity * delta
    motion = box_mover.get_motion(get_translation(), motion, character_box, terrain)
    global_translate(motion)
    velocity = motion / delta
This technique mainly works if you use VoxelMesherBlocky, because it gets information about which block is collidable from the VoxelBlockyLibrary used with it. It might have some limited support in other meshers though.
If you use VoxelMesherBlocky, it will use the list of AABBs specified in VoxelBlockyModel resources. If the list is empty, the voxel won't have collisions. You can also filter out some collisions by assigning the collision mask property of VoxelBoxMover. This will be matched against the collision mask property found on VoxelBlockyModel resources.
Raycast
An alternative raycast function exists as well, which returns voxel-specific results. It may be useful if you turned off classic collisions as well. This is accessible with the VoxelTool class. An instance of it bound to the terrain can be obtained with get_voxel_tool().
var terrain : VoxelTerrain = get_node("VoxelTerrain")
var vt : VoxelTool = terrain.get_voxel_tool()
var hit = vt.raycast(origin, direction, 10)

if hit != null:
    # The returned position is in voxel coordinates,
    # and can be used to access the value of the voxel with other functions of `VoxelTool`
    print("Hit voxel ", hit.position)
If you use VoxelMesherBlocky, it is possible to filter out some voxel types by specifying the collision mask argument. This will be matched against the collision mask property found on VoxelBlockyModel resources.
Custom meshing
Games with blocky voxels often have a custom way to interpret voxel data and converting it into geometry, for a variety of reasons:
- Using more than just an ID in voxel data to affect results
- Handling rotations and transformations at meshing time instead of precomputing them
- Separating shape, texture, colors or other properties from voxel data instead of mapping one ID to one model
- Procedural shapes half-way between cubic voxels and smooth voxels, depending on special rules with neighbors
- Packing vertex data to be used in custom shaders
- Etc...
There are mainly two ways this can go:
- Write your own custom mesher that does exactly what your game needs. This however requires that you implement that logic in C++, because meshing is a resource-intensive process. This would be ideal because it allows to make all assumptions you want with your game's logic and the way you want to interpret voxel data. It is one big reason so many voxel games use their own code instead of a library doing it for them. But it obviously means the engine cannot provide such mesher for you, it would otherwise be a big maintainance burden and having a mesher for every game would bloat the engine.
- Write a generic mesher relying on baked assets and settings that work in a mostly unified way. This changes the problem to be an asset management issue, which can be easier to solve than having to code a mesher. One voxel = one model. Models that need to be rotated are just variants. Different states or textures are more variants too. This is the approach used in the engine. The downside is that you have to bend your needs to fit this pipeline. The burden of generating variants is on you, and might not work out in some extreme cases.
If you still want to use a custom mesher, the only current ways are:
- Create your own C++ module to create your own mesher: no need to modify the voxel module, but you will have to compile Godot, inherit the base class
VoxelMesherand implement its virtual methods (check how the engine's own meshers are implemented for examples). - Modify an existing mesher in the module itself, or start from a copy of one.
While in theory we could expose a way for GDScript to inherit VoxelMesher, scripts are too slow to take on the task of individually polygonize each voxel, and it's not yet clear what form the API would take. A development branch mesher_script attempts to implement that, but isn't ready to use.